Wednesday, December 17, 2008

Adding Binding Attributes in NetBeans IDE


Hi all,

One thing you'll notice when you use NetBeans 6.5 is that component tags no longer have a binding attribute which is bound using a value binding expression to a property of the backing page bean. How does this affect the normal user? Well, if you want to script the component in Java code, you'll have to manually add the binding attribute. It's easy enough to do, just right-click the component and choose Add Binding Attribute.

Now if you try any 6.0 tutorials using NetBeans 6.5, you might come to a point where the tutorial will no longer work. I've been going through these tutorials and adding notes wherever binding attributes is necessary. I'll be blogging more about this in the days to come, so stay tuned.

See you soon.


--James


Sunday, October 12, 2008

Editing tomcat-users.xml in NetBeans 6.0


Hi all,


A few weeks back, I wrote a blog entry about how to access username and password information for the Apache Tomcat server. This information, however, was for NetBeans 5.5. In NetBeans 6.0, it's a very similar process. Here's how to do it in NetBeans 6.0:


  1. Locate your userdir (Select Help > About from the main menu).

  2. Write down the location of the userdir (or have it tattooed on your forearm next to the "I luv Netbeans" tattoo).

  3. Go the userdir and find the apache-tomcat-6.0.x_base\conf folder.

  4. Open the tomcat-users.xml file and write down the password that is listed for the "ide" user. (The "ide" user is generated by the IDE during installation.)


Important note: It is not recommended that you have the "ide" user password tattooed anywhere on your body. In a few years, and after several thousand development build installations (each with a unique password), you might run out of places. On the other hand, you might land a decent job in a circus.


See you soon!


--James

Thursday, September 25, 2008

Email Address Completion in Outlook Express


Hi again,
I got an email today asking why address completion had disappeared from Outlook Express. Apparently, the person was writing an email, and when entering the address, the address wasn't completed after a few characters were typed. This is how you can set this up:

  1. In the main toolbar of Outlook Express, choose Tools > Options.

    The Options dialog box opens.

  2. Click the Send tab.

  3. In the Send tab of the dialog box, check the box entitled "Automatically complete e-mail addresses while composing."

  4. Click Apply then OK.

  5. You might have to restart Outlook Express for the changes to take effect.


Hope this helps.


Cheers!


--James

Wednesday, September 24, 2008

CSS Tricks: Part III


Hi again,


I thought I'd add a few more CSS tricks.


Trick 1: Highlighting links on hover or when clicked


a:hover, a:active {
color: #FF0000;
background-color: #FFFF00;
}


Trick 2: Stacking headings (to get rid of unwanted space)


h1, h2 {margin-top: 3em;}
h1+h2 {margin-top: -3em;}


Trick 3: Using an image as a bullet


ul {
list-style-image: url(yourimage.gif);
}


More coming later!


--James

Tuesday, September 16, 2008

CSS Tricks: Part II

Hi,

Here are some more CSS tricks to add to your collection.

Trick 1: A background image behind text


Trick 2: Add color to a drop down menu


It should look like this:


Trick 3: Capitalize the first letter in each paragraph


Place this between the tags.


Then place this at the beginning of each new paragraph.


It should look like this:


Have fun!


--James

Thursday, September 4, 2008

CSS Tricks: Part I

Hi all,

I thought I'd share a few CSS tricks with you. Just for fun. No questions asked.

Trick 1: Removing underlines


a:link a:visited a:hover a:active {
text-decoration: none;
}
Trick 2: Adding a dotted underline

a {
text-decoration: none;
border-bottom: 1px dotted #000000;
}
Trick 3: Removing indentation in lists

ul {
padding-left: 1em;
margin-left: 0px;
}

More to come soon.


--James

Sunday, August 31, 2008

Adding a New User to the Sun Java Sys App Server


To add a new user to the Sun java System Application Server, just follow the steps in the previous blog entry until you get to the Current Users table.

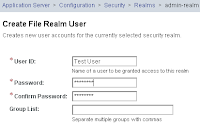
Then just click New and fill in the new User Name and Password


When you are finished, click OK to create the new user. It should look like this:


And that's all there is to it! Now you can log out and try your new user's settings.

--James

Monday, August 25, 2008

Changing the Default Password for the Sun Java System Application Server

Hi again,

Today I'm recycling a blog entry from my Sun blog that was written in 2005 for NetBeans 5. It still applies.

Most NetBeans users know about the default username and password for the Sun Java System Application Server. Very few people will ever need to change the default password, but a situation may arrise in which it does become necessary to assign a new password to the "admin" user name. This can all be done quite easily in the server's Administration Console.


How to get to the Admin Console:


  1. First, check to see if the Sun Java System Application Server has been added to the IDE. Go to the Services window and expand the Servers node. If the Sun Java System Application Server isn't listed, right-click the Servers node and choose Add Server.... This takes you to the Add Server Instance dialog. For more information about adding the server, refer to the NetBeans IDE Help Files.
  2. After the Sun Java System Application Server has been added, start the server by right-clicking its node and choosing Start Server. A green arrow appears next the server's node, indicating that the server is running.
  3. To access the Admin Console, right-click the Sun Java System Application Server's node and choose View Admin Console.
  4. The Admin Console opens in the browser.
How to change the password:

  1. Enter the default User Name (admin) and Password (adminadmin) into the respective fields.
  2. Expand the Configuration, Security, and Realms nodes.
  3. Click the admin-realm node to access the Edit Realm screen. In this screen, click Manage Users to view the list of current users.
  4. To change the admin password, click the user "admin" and assign a new password. Enter the same password a second twice to confirm it.
  5. Click Save > Close to save your new password.
  6. Click Logout to log out of the Admin Console.

That's all for today, folks!

-- James

Sunday, August 24, 2008

Mac: Showing Hidden Files in Finder

Hi all,
I'm back today with another tip: how to display hidden files in your Mac's finder. I ran into the problem when I was looking for some configuration files. Here's how to do it:

Open you terminal and type the following command:

defaults write com.apple.finder AppleShowAllFiles TRUE
killall Finder

That's it. In some cases, you may have to restart the Finder to see the files. Or you may not have to.

In any case, good luck!

--James

Saturday, August 23, 2008

RMI & NetBeans IDE


Hi everyone,


I'm sure there are a still quite a few people out there who are interested in how to start RMI in NetBeans. Although the demand for RMI support has been decreasing lately, this doesn't mean that it has completely disappeared. And with just a little tweaking, you can start the RMI registry in NetBeans very easily. Assuming you've already created RMIClient and RMIServer classes, do the following:


  1. 1. In your open project, go to the Files window.

  2. 2. Open the build.xml file in the Source Editor.

  3. 3. Paste the following Ant Script into the build.xml file:


    <target name="startRMI" depends="init">
    <exec executable="rmiregistry" dir="${build.classes.dir}">
    </exec>
    </target>


  4. 4. To start the registry, right-click the build.xml file, then select Run Target > Other Targets > StartRMI.

  5. 5. The Output window should display the result.

  6. 6. Run your RMIServer file. In the Output window, it should be displayed as "bound in server."

  7. 7. Run your RMIClient file, and watch it go.


See you tommorrow. Cheers!


--James

Friday, August 22, 2008

New Blog

Hi,

I've been wanting to do this for a while now. I already have one blog: James' Blog, and with all the reductions in force (RIF happening at my company (Sun Microsystems), I'm afraid to lose my blog eventually. So, I'll be picking the most helpful blog entries from that blog and writing some new ones. The goal of this blog is to help people perform tasks on their computer, whether they use Windows, Mac OS X, or Linux.

See you tomorrow with the next entry.

--James